Jams, Jellies, Veggies, and Broth

I’m on a quest to make better use of the harvest in my own part of the world, to reduce fast-food consumption and increase veggie consumption, and to mess up my kitchen to good purpose several times a week all summer long.

Most of my current jams and jellies are low sugar using Pomona’s pectin. This year I bought three boxes; next year I’m buying in bulk. The picture above is low-sugar watermelon jam and it’s my favourite.

“To me, it’s sort of funny that wasting food is not taboo. It’s one of the last environmental ills that you can just get away with.”

– Jonathan Bloom (@WastedFood)


Carrot-Pineapple Jam

img_20200731_084813

This recipe is brought to you by the fifty-pound bag of carrots that I bought two days ago on a whim and have been working through ever since, with the help of two somewhat-reluctant teenagers. Yesterday I made pickled carrot sticks, I filled my pressure canner with 18 jars of carrots in water, and I shredded and froze about twenty cups in one-cup and two-cup portions, for use in recipes like meatloaf and carrot cake at a later date. That took care of about thirty pounds of carrots.

Fifty pounds is a LOT of carrots, it turns out.

So last night I went looking for carrot jam recipes. I found out that carrot jam has been a Middle Eastern recipe for centuries, going back at least eight hundred years in Iran. However, the Middle Eastern recipe does not use pectin – it just cooks the carrots down to a spreadable consistency. This would work if I had, say, five pounds of carrots to work with. I have twenty pounds. I needed to be faster.

I decided to try adding pineapple and Pomona’s Pectin. The result is delicious, but I’m going to adjust it later today when I acquire more pineapple. The first attempt went like this:

Ingredients:

  • 3 cups carrots, shredded, approx. 4 grocery-store large carrots
  • 1 can crushed pineapple with juice
  • 1 cup apple juice
  • 4 tsp calcium water
  • 4 1/2 teaspoons Pomona’s Pectin
  • 2 cups sugar
  1. Prepare your jars, rims and seals. Set your canner boiling.
  2. Run your carrots through your food processor to shred them. If you don’t have a food processor, chop the carrots into chunks and cook them in a little bit of water until they are soft, then mash or stick-blend them. Measure out 3 cups and freeze the rest for carrot cake or meatloaf.
  3. If your can of pineapple was bought with pineapple upside-down cake in mind and is in some format other than crushed, run it through the food processor, too.
  4. Add the first four ingredients to a large pot with a heavy bottom. Cook for 5 minutes if the carrots have already been cooked. If they haven’t already been cooked, cook for 15 minutes at a simmer.
  5. Meanwhile, mix the sugar and pectin well in a separate bowl.
  6. When the carrot/pineapple/juice mixture has cooked, add the sugar mixture, stirring vigorously. Bring the heat up to a full rolling boil and then immediately take it off the heat.
  7. Fill your jars, affix seals and rims, and process in your canner for 10 minutes. Remove and allow to cool undisturbed for several hours.


This jam is really good. I’m almost perfectly happy with it. Later today I’ll be trying it with pineapple juice in place of the apple juice, to see if I can kick it up a notch. It’s not like I’m going to run out of carrots anytime soon!

Adventures in Tomatoes: Spaghetti Sauce

Tomatoes are the perfect canning ingredient. They make excellent additions to a wide variety of recipes and they can beautifully. But they’re also a ton of work and require some specialized knowledge to get right, so here’s what I’ve learned so far.

Ingredients, from the Presto Pressure Canner Manual, FDA-tested:

  • 30 pounds ripe tomatoes
  • 1 cup chopped onions
  • 5 cloves minced garlic
  • 1 cup chopped celery OR green pepper
  • 1 pound fresh mushrooms, sliced (optional)
  • 1/4 cup vegetable or olive oil
  • 1/4 cup brown sugar (I omitted this)
  • 4 tablespoons minced parsley (I forgot to buy this)
  • 2 tablespoons oregano (I used fresh instead of dried and more than this)
  • 4 1/2 teaspoons salt
  • 2 teaspoons black pepper
  • My addition: half a cup chopped fresh basil

The recipe says not to increase the proportion of onions, peppers, or mushrooms. I take that to mean you can play with the spices and herbs a little bit with impunity.


Selecting Tomatoes

The first tomatoes to come on a good sale in most stores around here are big field tomatoes. Don’t use them for canning. They’re mostly water and they’re picked underripe, so they’ll be super-acidic and you’ll have to cook them forever to get a good consistency. The Italian grandmother in the grocery store talked me out of those. The key, according to that lovely granny, was that they should smell sweet and flavourful.

Tomatoes for sauce
This was my mix of orange and red tomatoes for sauce. The sauce turned out a little bit more orange than most spaghetti sauces, but the flavour is perfect.

If you are too impatient to wait for the big boxes of Roma tomatoes that the Italian grannies use, the next best thing is the cluster tomatoes still on the vine. They have to be ripe enough to fall off the vine with almost no pressure. That’s what I bought, and the ones that were on the best sale were orange.

I used a mix of types for this recipe: about half were orange and the rest were cluster red tomatoes and a few Romas I found.

If you wait about a week longer than I did, you can buy a case of Roma tomatoes for about a third of what I paid. I did that too, and canned them for other recipes. But that’s a different story.

Prepping Tomatoes

The first job, and the most labour-intensive one, is to skin the tomatoes. You do this by starting a small pot of boiling water, letting a few tomatoes boil for a minute or two, transferring them to ice water, and then to a cutting board. Wait until they’re cool enough to handle and then the skins should come off pretty easily. Sometimes the skins will crack while they’re in the boiling water, but sometimes they won’t and you can still peel them.

Orange tomatoes
This is what well-behaved tomatoes look like after being boiled for a couple of minutes and then dipped in ice water. I barely had to touch them to get the peels to slip off.

First Cooking

Yes, the cooking is done in two stages. The first stage is to get the tomatoes to release their juices. This takes about half an hour for a full pot (I had a very full pot.) I cut out the cores, chopped them in half, and put them on to cook. After a while, when there was more juice than there had been, I took a potato masher to them. When they were pretty thoroughly crushed and offering no further resistance, I transferred them to my food processor to blend into a smooth purée.

cof
The Roma tomato portion of the project, beginning the first cook. I did this part in three batches of about ten pounds of tomatoes each.

You’re going to have to process the first cooking of the tomatoes in a few batches, probably, and then find a way to set them aside until you’ve got them all ready to go in the same pot. I found I had too much to go in the same pot until halfway through the second cooking phase.

Is it sauce yet?

Now that you’ve got all your tomatoes puréed and hopefully down to only one or two pots (I had three) you get to put it all on the heat for the second cooking. This is the stage where you simmer it until the bulk of the water evaporates. You’re going to diminish the volume of this sauce by a third to a half, and it takes a couple of hours, depending on the juiciness of your tomatoes.

After you get the tomatoes started on their second cooking, grab a frying pan and your olive oil, onion, garlic, green pepper/celery, and mushrooms. Cook it all in the frying pan until it’s soft, then add it to your biggest pot (hopefully your only pot) of cooking tomatoes. This is also where you add your green herbs or dried ones if that’s what you’re using. (Seriously, splurge on the fresh stuff. I’ll show you what to do with the leftover fresh herbs, but even if they go bad in the fridge, it’s worth using them in this recipe.)

cof
This is the biggest pot with about half the tomatoes simmering in it. I’ve added the stuff I fried up but not the herbs yet.

Now you sit and watch your sauce simmer down until there’s a whole lot less of it.  Stir it pretty often. If you’ve got things in several pots, you want to gradually reduce down to just one pot. During this time, prepare your jars. The recipe says it made nine pints; I got double that, so I guess I didn’t cook it down as much as they were expecting.

If you want to water-bath can this recipe, it’s safe to do so IF you add extra acid, probably in the form of lemon juice or vinegar. We have acid reflux dogging our recipe choices in this household so I didn’t want to increase the acidity, and I can get more jars in my pressure canner than in my water-bath canner anyway.

Go through the jarring and pressure-canning process, 20 minutes for 500mL jars and 25 for 1L jars, at 11 pounds of pressure, then enjoy your sauce for as long as it takes you to eat it all.

cof
Aren’t they pretty?


Weeknight Chicken Cacciatore

cof

Clearly I didn’t take my picture fast enough. The family member whose dinner this is was out when dinner was ready.

This is a go-to weeknight recipe for me because it takes about forty minutes from freezer to table and it’s a family-pleaser. I serve it with microwaved frozen veggies. It would go equally well over pasta or a hamburger bun, but I’m watching my carbs.

Ingredients:

  • Breaded chicken patties or fillets, up to 6
  • 1 500mL jar of homemade spaghetti sauce
  • 1/2 cup grated parmesan or other Italian-flavour-friendly cheese

Follow package directions to cook the chicken patties to the point where you take them out of the oven to turn them. Pour the sauce over them as evenly as you can. Cover with shredded cheese. Bake for the longest suggested time remaining (so, if it says 10 to 15 minutes more, go for fifteen.)

Tuesday nights don’t get much simpler than this, unless you’re doing Random Orange Vegetable Soup.


Beef Stew in a Jar

One of my goals for my canning this summer is to reduce my fast-food intake during the school year. For me, there are two situations that lead to fast food. The first is the evening rush when teenagers have somewhere to be at 7 and my wife doesn’t get home until 6:30. The second is first thing on a weekday morning when I realize I’m running late, or there are no good leftovers/salad fixings in the fridge, so I stop at a grocery store and grab a sandwich and a yogurt with fruit.

For the first scenario, soup and sandwiches is the perfect solution. Everyone makes their own sandwich, and there’s a pot of soup keeping warm on the stove for the moment when each individual is ready to eat it. But the second situation calls for a completely different approach.

Enter Meals in a Jar.

I’ve frequently used a can of soup from the grocery store to tide over in this instance, but that has some downsides. For one thing, I often don’t love the flavours or textures of canned soup; for another, the cans are often a little too big and can’t be closed to bring them home or store them in the fridge at work.

On Friday, I made a delicious chili that will do this job. Today, I’m making Beef Stew in a Jar. The concept is simple: stewing beef, freshly-made beef broth, garlic and onion, some Montreal Steak Spice Mix, and whatever vegetables I feel like throwing in to each jar.

For a significant nutrition boost, I’m also adding some red lentils, which are the only part of this recipe that poses any type of canning difficulty. More on that in a moment.

For this recipe, I’m using a cold-pack method. That means I’m not blanching or pre-cooking anything except the broth itself. It greatly reduces the amount of work required and does not increase the danger, because you’re going to be boiling the fuck out of it all in the pressure canner for a total of nearly two hours (75 minutes at pressure, plus time it takes to come up to and down from that pressure.)

Step 1: Make your broth. I got some beef bone pieces from my local grocery store, and then followed my recipe for broth. A couple of carrots, the remains of some celery and onions I had around, and a bag of peels from the sweet potatoes I made two weeks ago, and the broth is simmering away happily.

Step 2: When the broth is done, set it aside off the heat to cool for a little while. While that’s happening, deploy your teenagers to peel and chop your selection of vegetables. Today, we’re using turnips, carrots, onions, celery, and green beans. I’m cheating on the carrots and using peeled baby carrots, I’ve left the green beans pretty long, and I chopped the turnip by hand. Everything else is getting run through the slicer on the food processor. Have I mentioned that I love my food processor?

Step 3: Prepare your canner. For a cold-pack recipe, I like to put the water in the bottom and then turn the heat on low so that the water stays warm. I don’t want it boiling, but I want it warmer than room temperature when I start putting jars in it, so I do this first.

Step 4: Line up your jars. I’m cheating on this today; I washed them but didn’t sterilize them beyond that. This is also when you prep your rims and seals so they’re ready to go. I’m using 500mL (pint) jars because that’s the serving size I want.

Step 5: Assemble your stews. This is the fun part, because each jar can be a little different. First, a few cubes of stewing beef, enough to cover the bottom of the jar; then a crushed clove of garlic and some onion; a little bit of Montreal steak spice or some other spice combo that you like with beef; and now you get to have fun.

If you’re using lentils, you’ll need to pay attention to how full you pack the jars. Assume that the volume of lentils you put in is going to at least double during cooking. That means that if you put in two tablespoons of lentils, you need two tablespoons more liquid than you would otherwise have, which means two tablespoons less vegetable. If you don’t do this, some combination of the following dire consequences will ensue:

  • The cooking process will push food out under the seal of the jar, which will prevent them from sealing (this is the most likely result.)
  • The lentils will not have enough liquid so they won’t cook properly
  • You may even explode a glass jar or two inside the canner, ruining the entire batch and quite possibly the canner itself, if not your kitchen

I find a tablespoon of liquid equals about a centimetre of headspace, and I’d rather err on the side of caution in this, so I’m stopping packing my vegetables about an inch lower in the jar than I normally would, and filling up with broth to the one-inch headspace level that I need. Since I’m not using potatoes (my wife doesn’t like them) lentils are a key ingredient for texture; they’ll dissolve and thicken the broth. It’s worth having less of everything else to make sure they cook right.

When you’ve packed the jars with meat, lentils, and veggies, add broth up to the one-inch headspace mark. Apply rims and seals and place in the canner.

Step 6: Bring the temperature in the canner up slower than you normally would. Don’t move it right to high as soon as you put the lid on. You want the food to heat up a little slower than that this time, since we’re starting from a cold pack. A newbie mistake I’ve been making is to heat the food too fast, which forces food out under the seals and prevents sealing. Take it slow. After all, you set aside your entire afternoon to watch this pot boil anyway, right? RIGHT? Well, you should have.

Step 7: Process at 11 pounds of pressure for 75 minutes, then remove from heat and let the pressure come down to standard before opening the canner. The processing time is based on the time needed for the longest ingredient, which is the meat. If you’re using 1L (1 quart) jars, the processing time is 90 minutes.

If you have leftover broth, you can put it in the fridge to use soon, put it in the freezer to use later, or put it in jars to process after the stew is done. It only needs to process for 20 minutes.
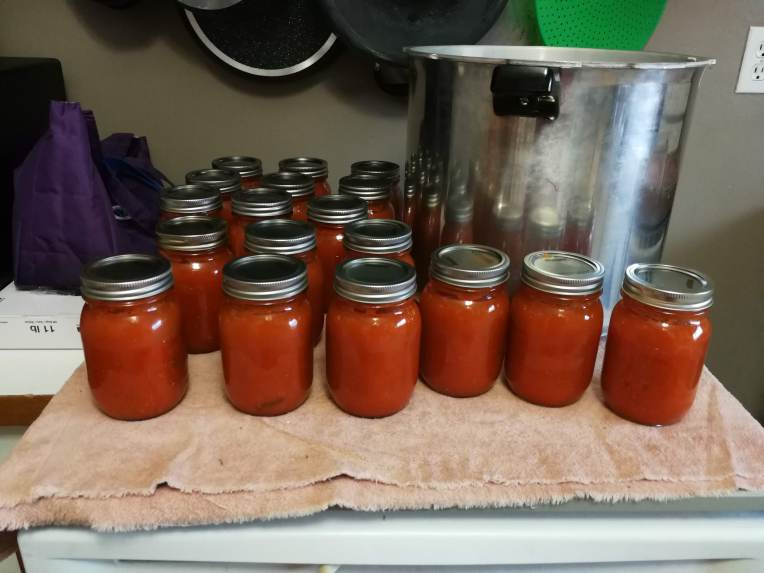
Too busy to write

It’s been a busy week around here. Forthcoming posts include spaghetti sauce, canned tomatoes, chili, and all the things you wish you had an Italian grandmother to teach you about tomatoes (which is to say, stuff I’ve learned from talking to Italian grandmothers in local grocery stores, and mistakes I’ve made when I didn’t take their advice.) I’ve also taken pictures of every step of a pressure-canning project to show you how it’s done, or at least how I do it.

I’ve got two weeks left of my summer vacation and I need to make VERY good use of them.

The Story of Rhubarb

Or at least, MY story of rhubarb.

Dial back the rotary phone of your memory to the year 1982. The long Winnipeg winter was finally over. The six solid weeks of being bundled up literally to my eyebrows in the -20C temps had given way to the reluctant, cool spring of that part of the country. The ice rink my dad had made in the backyard had melted. And over the back fence, our left-hand neighbour was turning over the earth.

The Schusters were an elderly couple with an accent six-year-old Velvet had to work to understand. With my grandparents all in far-away Ontario, I cheerfully and unthinkingly adopted them as an extra set. He was friendly and kind to my brother and me, and my mom gently encouraged us to spend time there. When I asked her why, she told me they were holocaust survivors. I doubt she told me very much then about what that meant. In any case, adopting Mr. Schuster meant exploring the wonders of Mr. Schuster’s Garden.

He grew vegetables I’d never heard of and have only recently tried for the first time, like kohlrabi. He grew corn. The middle of each of his beds had tall poles for beans and peas. But most importantly to this story, he grew rhubarb.

I’ve since learned that rhubarb is basically a weed of a vegetable. It will grow almost anywhere and especially likes the spots no other plant will have much to do with. But at the time, those tart red stalks were a revelation. He showed us where his rhubarb had jumped the fence and started to grow in our unkempt, recently-dried-out ice rink lawn, and from that day on I was hooked.

Mom would give us a little Tupperware tumbler with an inch of sugar in the bottom. We’d lick the stalk, puckering up with the sourness of it, and then dip it in the sugar. I suspect my love of sour candy stems from those early experiences eating raw rhubarb from Mr. Schuster’s garden.

Dial forward now, past touch-tone and cordless all the way to smart phones, to the rhubarb that grows in my ex-husband’s front yard. I planted it there years ago, culled from the excellent plant that was spreading too much at my mother’s house, and it’s been happily tussling with the bindweed ever since. This year, there was a bumper crop. My ex’s partner is allergic to rhubarb, so I harvest it and cook with it and get my kids involved in all things rhubarb, partly for its own sake and partly so I can tell them about Mr. Schuster, kicking back at the darkness by planting a wonderful vegetable garden and grandparenting two lonely little kids far from their own family.

sdrThis is about a quarter of what I got this year. Some of the stalks were two inches around.

So, the first step in using this lovely vegetable is to find a supply. My preference is the forgotten corners of friends’ yards, but the grocery store will supply you in a pinch. It’s ripe when the stalks are tall, thick, and red. If you’re harvesting, take a paring knife and a big reusable bag. Chop off the stalk at the base, chop off the leaf at its base, drop the stalk in your bag, and compost the leaf.

When you return to your kitchen with your bounty, wash it all, chop it into one-inch pieces, and stew it in just a tiny bit of water until it mashes up easily under the spoon. Some people suggest adding sugar, but I never do because I want to be able to control the sugar in the finished recipe, and it’s hard to do that if I’ve added some at this stage.

Rhubarb comes ripe before any other fruit – it’s an early-spring vegetable though I’ve been known to get second and third crops out of it well into the summer – so I usually don’t cook with it immediately. This year, I got smart. Most jam recipes call for either two or four cups of rhubarb, so I decided to freeze it in paper cups from the dollar store that held one cup. I let the mushy rhubarb cool in the pot, then ladled it into my paper cups and covered it with cling wrap. I put them in the freezer in a single layer until they were solid, then stacked them. From that first batch, I got eight cups; the second harvest a few weeks later netted me another two. The three below are all that remain.

cof

Recipes so far include the obligatory strawberry-rhubarb jam that I did a second time because it was so delicious, and a wonderful blubarb that I had the foresight to double.

We moved back to Ontario the following winter so I only ever spent that one spring and summer with Mr. Schuster. Being only seven at the time, I didn’t do a good job of keeping track of people in Winnipeg when I left, and I don’t know the rest of Mr. Schuster’s story beyond where it intersected briefly with mine. I like to think that maybe I gave him some gifts to balance the many he gave me.

Thank you, Mr. Schuster.

I tend to get ahead of myself.

Thanksgiving in Canada is the second Monday in October, which really throws my American wife off-balance. This year, we’re going to her sister’s in the US for American Thanksgiving, too, at the end of November. So I’ve started thinking about how to host, then travel, with good food that showcases my talents.

Cranberry sauce is a must.

My base recipe is this one from Damn Delicious:

https://damndelicious.net/2013/11/15/cranberry-orange-sauce/#comment-162663

I add a bit of ground cloves as well, but otherwise make it as suggested, doubled.

Then I can it, because cooked fruit can generally be canned and I need it to last long enough for both Thanksgivings and Christmas. That’s three months. The fridge just won’t cut it.

Cranberries are tart enough that you don’t need to add lemon juice to water-bath can. Orange zest and freshly-squeezed orange juice are both great sources of natural pectin. So I just cook the sauce until it gels when dropped on a cold ramekin, and then fill jam jars and process for ten minutes in my water bath canner, just like jam. Because it is.

In addition to turkey, this stuff is delicious on squash, pumpkin, or sweet potato. (There, you just figured out the OTHER reason this stuff is on my mind today.) It’s lovely in Greek yogurt, though it’s tart so you may want to add a bit of honey. A scoop of this stuff is even really good in oatmeal or over vanilla ice cream.

If you can do it with pumpkin…

…you can do it with sweet potato.

Operating on that principle, today’s experiment in Use Up Some of that Mountain of Canned Sweet Potato is a variation on an old recipe of my mother’s, which she probably got off the back of a can of pumpkin: Pumpkin Spice Muffins.

Her recipe had exactly two ingredients: a spice cake mix, and a can of pureed pumpkin. She poured it into a muffin tray and it made about a dozen thick, cakey muffins. She would freeze them by the dozen and when we wanted a treat, we’d defrost in the microwave, cut them in half, butter them liberally, and enjoy. (I am the eldest of four and my mom worked full-time after the youngest sister was born, so quick, cheap, and pretend-it’s-healthy treats were a priority for her in terms of keeping us fed.)

I don’t like spice cake mixes. I find the spices aren’t sufficient for the flavour I want. So I mix up my own holiday spice mix around this time of year, in a Mason jar I don’t actually want to use for canning (for example, one of the wide-mouth jars I have lying around.) The mix is:

  • 8 parts cinnamon
  • 4 parts ground ginger
  • 2 parts ground cloves
  • 1 part ground nutmeg
  • Maybe a bit of mace

Mix it up fresh at least once a year and use it in anything you want to taste like the holidays, which is to say, any orange vegetable dish.

So the recipe I’m trying today is:

  • 1 jar sweet potato, with juice, mashed
  • 1 white or yellow cake mix
  • 1 tbsp Holiday Spice Mix

Follow the times on the box but be prepared for a longer bake time.

I will update the post with pictures of the yummy goodness that diabetics like me probably shouldn’t eat, as soon as I’ve made them. With any luck I’ll remember to take pictures of the muffins before I eat any.

Update, from left to right: the batter is thick enough for a fork to stand up in it; I filled the muffin cups fairly full so I only got nine muffins out of the recipe; I didn’t take the picture of the finished ones soon enough to get all of them. They’ve been pronounced delicious and please-make-again by my family, though I’ve been advised that silicone is not actually non-stick and butter would improve matters.


All in all, a successful not-pumpkin experiment!